

Computer Assembling
computer assembling part 1

Part one will explain about your computer is fixed by agan destination visitors can recognize perangakat-perangakat are in pairs on a computer Unite
Computer Hardware Assembling
A. INTERNAL COMPONENT UNIT SYSTEM
Here are the components necessary to build a unit system
1. Central Processing Unit (CPU) / Microporcessor
Is a programmable logic device that does all the processing instructions, logic, and
arithmetic in the computer

2. Random Access Memory (RAM)
Used to store programs and data used by the CPU.

3. Motherboards
Is the center or the printed circuit board (PCB) primer containing a number of slots and sockets
for various types of PC components

4. Power Supply
As the name suggests it provides a power source to make your PC operate.

5. Harddisk
Is non-volatile storage in which the stored data and programs that are not used by the CPU

6. Optical Media
The last section is used to read the optical-disk media from the setup program Operating System
or other programs.
You

You can start the installation in a state where all internal components installed in the
unit box system (Case), or not

B. PHASES assemble COMPUTER
After the motherboard is available, computer assembly step can be started from the following stages:
1. Installing CPU
Open the lock, then put the CPU in the socket based on the correct position.

Do not forget to give a thermal heat sink compound and installing it

Make sure the connector is attached and the fan head sinks attached to the pin on the motherboard

2. Installing RAM
Here is the size of RAM is recommended based on the type of operating system used

Make sure the RAM is used in accordance with the specifications of the motherboard. Here's how to install
RAM into the socket

3. Install Power Supply
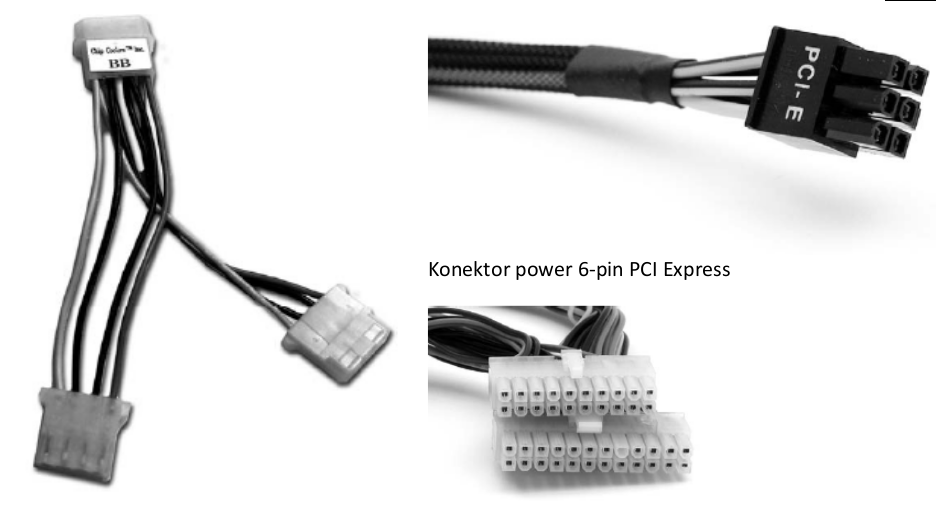
The following are the types of connectors commonly found in power supply


Put the power supply in the space provided in the case, then paste with baud.
Attach the power connector to the motherboard and then plug the power by jumper
using electrical conductivity are like amber in the right side to test whether the motherboard
been able to work with a given intake dayalstrik Suplly power.
4. Replacing Hard Drive
Here is how to install power and data cables (IDE) to the hard disk. How to wiring
similar to the way the installation of the motherboard to the hard disk.

 IDE 1 is called primary, IDE 2 is called
secondary. Any IDE can be used
for disk drives master and slave. Disk
drives in a single IDE cable should not be
alone or slave master only (must be
different). Setting a disk drive as
master or slave through
jumper on the disk drive as
shown in the image on the left side.
Once the data cable is attached with
correctly, connect the appropriate power cord
with the type of disk drive
computer assembling part 1

Part one will explain about your computer is fixed by agan destination visitors can recognize perangakat-perangakat are in pairs on a computer Unite
Computer Hardware Assembling
A. INTERNAL COMPONENT UNIT SYSTEM
Here are the components necessary to build a unit system
1. Central Processing Unit (CPU) / Microporcessor
Is a programmable logic device that does all the processing instructions, logic, and
arithmetic in the computer

2. Random Access Memory (RAM)
Used to store programs and data used by the CPU.

3. Motherboards
Is the center or the printed circuit board (PCB) primer containing a number of slots and sockets
for various types of PC components

4. Power Supply
As the name suggests it provides a power source to make your PC operate.

5. Harddisk
Is non-volatile storage in which the stored data and programs that are not used by the CPU

6. Optical Media
The last section is used to read the optical-disk media from the setup program Operating System
or other programs.
You

You can start the installation in a state where all internal components installed in the
unit box system (Case), or not

B. PHASES assemble COMPUTER
After the motherboard is available, computer assembly step can be started from the following stages:
1. Installing CPU
Open the lock, then put the CPU in the socket based on the correct position.

Do not forget to give a thermal heat sink compound and installing it

Make sure the connector is attached and the fan head sinks attached to the pin on the motherboard

2. Installing RAM
Here is the size of RAM is recommended based on the type of operating system used

Make sure the RAM is used in accordance with the specifications of the motherboard. Here's how to install
RAM into the socket

3. Install Power Supply
The following are the types of connectors commonly found in power supply


Put the power supply in the space provided in the case, then paste with baud.
Attach the power connector to the motherboard and then plug the power by jumper
using electrical conductivity are like amber in the right side to test whether the motherboard
been able to work with a given intake dayalstrik Suplly power.
4. Replacing Hard Drive
Here is how to install power and data cables (IDE) to the hard disk. How to wiring
similar to the way the installation of the motherboard to the hard disk.

secondary. Any IDE can be used
for disk drives master and slave. Disk
drives in a single IDE cable should not be
alone or slave master only (must be
different). Setting a disk drive as
master or slave through
jumper on the disk drive as
shown in the image on the left side.
Once the data cable is attached with
correctly, connect the appropriate power cord
with the type of disk drive


Comments (0)
Posting Komentar